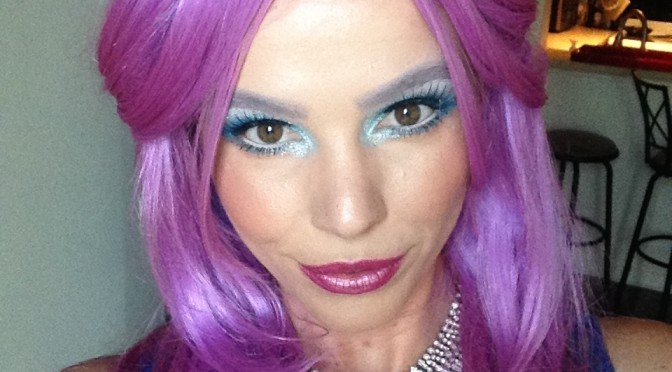
I realized today that I hadn’t posted an Instagram picture of my makeup in a while and I had nothing else to do for the rest of the day so I decided to play with my makeup. I’ve been thinking about being a mermaid for Halloween for a few weeks now and in the back of my mind I was also thinking about how my LA Splash Cosmetics Crystallized Glitters would finally be put to good use with a mermaid look. This look could also be a fairy or a fancy alien. I think that playing around with makeup is a fun way to get creative and a good way to remind yourself of all the products you have but aren’t using on a regular basis. I wanted to share how I did it because it might give you some ideas for your Halloween makeup:
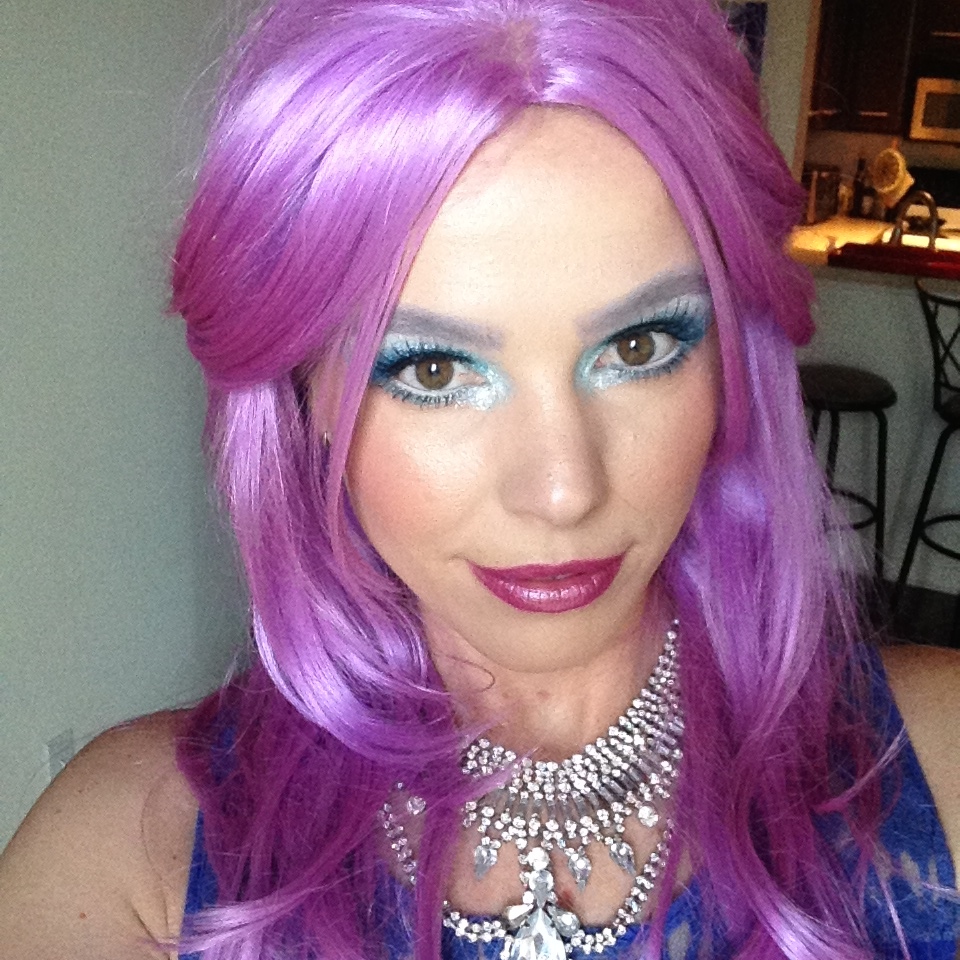
1. First I applied some scotch tape to the back of my hand and removed it several times to make it less sticky. Then I placed the tape under my eye in order to get a sharp line (Casey Holmes uses this technique a lot on YouTube). I first applied the NYX Jumbo Eye Pencil in Milk all over my lid all the way up to my eyebrow and blended it in with my finger. I then put some Too Faced Shadow Insurance Glitter Glue on a small synthetic eyeshadow brush and applied it all over the lid all the way up to the brow (but I did this part one eye at a time). LA Splash sells a really popular Eyeshadow Sealer/Base to use with their shadows but I didn’t buy it when I ordered from them a few months ago. I guess I felt like $30 worth of glitter was plenty that day. Using the same brush that was already sticky from the glue, I used the LA Splash Crystallized Glitter in Tantrum Teal all over my lid and up to my brow bone. Next I applied the glitter in Oceana in the outer corner and the crease. Finally I applied the glitter in Trance under my brow bone and in the inner tear ducts as a highlight. I also wore Trance all over my lid, in my inner corners, and as a liner underneath my bottom lash line for LA Pride this year:

Yes I realize I wear those flower head pieces a lot, but I had to travel all the way to Glendale and go to The Icing to get them!! I finished up my eyes using my Ck One Color Mascara 800 in True Black that is a free gift at Ulta on your birthday. I have really been liking this lately and the brush twists at the handle which can make the bristles closer together or further apart which is cool. It doesn’t have great reviews online though. I then applied Forever 21 falsies that I picked up a while ago for $1. These falsies aren’t bad, but the band is a little thicker so you have to make sure to apply them very carefully and very close to your lash line. I applied them with the amazing glue that I talked about in my August Favorites post.
2. For my brows I applied concealer on top of them and then a layer of NYX Jumbo Eye Pencil in Milk on top of that and then tried to use Makeup Geek Pigment in Bewitched which is a purple color to draw them on. That didn’t work great so I used Maybelline Color Tattoo Cream Gel Shadow in Painted Purple to draw them in similar to how I described in my How to Fill in Your Brows post. If I were to do this part again I think I would have skipped the concealer, just applied the Jumbo Eye Pencil in Milk, and set that with a translucent powder and tried to draw them on top of that with the Color Tattoo Cream Gel Shadow and then maybe packed some of the MUG pigment on top to intensify it. It took a long time to do them my way and the color looked more gray than purple. Drag queens usually use a foundation stick set with powder or a glue stick with foundation over it to do their brows.
3. Next up was my foundation. I decided to use my Loreal True Match Lumi foundation which is 1-2 shades to dark for me so I never wear it. I also have oily skin and this foundation is a little too dewy to work with oily skin on a hot LA day so today was the perfect chance to try it again because it wouldn’t look too crazy dark in pictures and I wouldn’t be wearing it long. I applied it using my Sigma F80 Flat Top Kabuki Brush which I haven’t used in forever because after a couple months a ton of the bristles started coming out so it’s sort of jacked up. I could not believe how good this foundation went on. I had basically rubbed it around my face once with my messed up brush once and it practically looked blended in (obviously I continued to blend until it was actually blended). This foundation had such amazing coverage I can’t get over it. I’ve been using my MAC Studio Fix Fluid which is super full coverage and it has not been able to cover up my blemishes like the True Match. I didn’t even need an extra layer of concealer on them! The foundation feels thinner than Mac’s Studio Fix Fluid and yet the coverage is better somehow. I didn’t even need a second layer on my problem areas like I usually do with foundation. Even though the color was too dark it still blended pretty well with my body somehow. I was really impressed with this foundation and now I really want it in my actual color especially since fall is coming so hopefully it will work for me better in a colder season.
4. I then highlighted using a light concealer. I used the cult favorite (and my recent favorite for the under eye area and highlighting) Hard Candy Glamoflauge Heavy Duty Concealer in Ultra Light. This stuff is about $6 and the tiniest bit goes such a long way! Some days I like this better than my MAC Pro Long-Wear concealer and it is 1/5th of the price and I don’t need as much product. I applied this under my eyes in a triangle shape, in between my eyebrows, down the bridge of my nose, on my Cupid’s bow, on my chin, and on the corners of my mouth. I also dotted on some Benefit High Beam liquid illuminator on the tops of my cheek bones, above the outer 1/3rd of my eyebrows, down the bridge of my nose, and on my Cupid’s bow and I blended it in with my finger. Here is a picture from the Lily Ghalichi & Kim K Tips and Tricks post where I explain how and why to highlight with a concealer in more detail:

5. Next I contoured using my Real Techniques Expert Face Brush (which is only $9 and is awesome) and NYX Matte Bronzer in Light. I made a whole post about how I contour my face so check that out for more details.
6. I then used a blush my step-mom gave to me while cleaning outer her makeup drawer that I haven’t used too much. It’s MAC blush in Buff. I applied it to the apples of my cheeks, but concentrated more product closer to my hair line above where I contoured. I then applied The Balm’s Mary Lou Manizer highlighting powder on my cheek bones so I would really be glowing like crazy. If you like a really intense highlight you need to check out Mary Lou Manizer it’s a golden hue that is super intense, really catches the light, and is long lasting. A very light concealer + a liquid illuminizer + a powder highlighter = serious glow.
7. I then applied Cover Girl Ink It! eyeliner in Aquamarine ink under my bottom lash line and blended it using a pencil brush and the MAC blush color which worked nicely. I applied the NYX Jumbo Eye Pencil in Milk to my water line and a coat of mascara to my lower lashes. Using the white eyeliner makes your eyes appear larger and more open.
8. For lips I applied MAC lipstick in Show Orchid which is a gorgeous color I forgot I had. It’s such a statement color that it’s kind of a pain in the ass to wear out so I don’t wear it too often. I wanted to intensify it so I added a mauve pigment and a champagne colored pigment on top. I tried to make it so that the Show Orchid was darkest around the edges of my lips, then the mauve pigment was inside of that, then the light pigment inside of that. This didn’t produce the ombre/sparkly/intense/statement lips I really wanted so after I took some pictures I decided to wipe it off and applied some MAC Stroke of Lust lipstick which is a sparkly bubblegum pink color instead.

This wig is from Hollywood Wigs and I bought it 2 years ago for my birthday which had a Wigging-Out theme. Another reason I wanted to be a mermaid is because just like my flower head pieces, I like any opportunity to wear this awesome wig I just love the color it’s so fun! I encourage you to dig into your makeup bags/drawers/bins/wig collection and get messy and have some fun playing around. Here’s my other Halloween costume idea if I keep the dark lip color:
